Tuesday, January 18, 2011

Projects #14, and #15

For a special 3-year old boy on my Christmas list this year, I decided to put my embroidery unit to good use.
I had a child size apron that I had bought from Hobby Lobby, and put his name, and a little dinosaur on it. I've seen pictures of him helping out lots in the kitchen, so hopefully, this will go to good use.
I also made him a reversible Batman/Superman cape. I've made these for most of my nieces and nephews. With a few exceptions, they seem to really like them.

He was also the recipient of the fishing game, so I guess all his gifts were sewn this year. (Which is good, because then I don't have to worry that he already has them!)

Monday, December 6, 2010

Fishing Game- Project #13

This was a super fun little project to make. I got the idea for it here at one of my favorite blogs. there is a link within it to a tutorial.
I have been trying to find ways to use up my scrap fabric. Moving has made me realize that it either needs to be used up, or thrown out, instead of stored indefinitely. So, I already had the fabric, which I thought worked great for little fishies.
I just played around and drew my own patterns. I wanted them to look a little Dr. Seuss-y and fun. I thought that they did. I used buttons from my Grandma's button collection that I inherited. I would recommend sewing the button eyes on before you sew the 2 halves together. I did not, and it was a lot harder!

I tried two different methods. I made 2 identical sets of 8. One set I glued magnets on the inside, like the tutorial suggests, and the other set I sewed washers to. Then I had my kids test them out. Washers were by far better. In fact, I went back and sewed washers onto the set that had the magnets.
My kids absolutely loved them. I used our set at church, where I am in charge of doing the singing time with the kids. I safety pinned the names of songs they knew onto the fish, and let the kids "fish" for what song we would sing next.
Even the older kids loved this. The other set is for someone on my Christmas list (who I really hope isn't reading this- or at least their parents aren't!)

Since I already had the fabric, buttons, stuffing (poly fill), string, stick, glue, all I had to buy was magnets and washers!

Friday, December 3, 2010

Thanksgiving Centerpiece Project #12


The day before Thanksgiving I decided that I should make a centerpiece out of one of the pumpkins we didn't carve into a jack-o-lantern. We have made these before, but never with such big pumpkins.
I picked up 2 bunches of flowers from Albertsons. And 2 15" candles from Hobby Lobby. They were out of fall colors, but at least they had 15" ones instead of just 10" or 12". We needed the height. Then I really had to improvise to get everything to fit right. You can see the things I had to tape together to get the right height, and have a container for the floral foam to go in.
I tried to bunch them so it looked like a mound of mums and flowers. I didn't really want it any taller, or it would be impossible to have conversations over the table.
Even the bow I had to improvise with. I thought I knew where my wire was, but couldn't find it, so it is held together and attached to the arrangement with a paper clip.

It still turned out nice:

Wednesday, December 1, 2010

Finished Project #11- Kid folding Chair makeover


This chair above used to look brand new. Because I was smart and stored it inside the house, and only pulled it outside when we needed it.
But then, we had my family reunion in May, and I was pregnant, and getting the house ready to sell, and somehow that chair just stayed outside. During the whole, hot New Mexico summer. I'm sure if we had packed ourselves, it would have just been thrown away. But it got moved to Texas with the rest of our stuff, so I thought I ought to do something with it.
So, here it is all made-over into a pink pretty chair.
I know that those before and after pictures can make things look SO easy. And in reality, this should have been an easy make-over. Something I should have been able to do during one afternoon while the older kids were at school, and the 3-year old was napping.
But here's what really happened:
When I unscrewed the seat and back covers I realized that I needed some needle-nosed pliers to get the staples out. I had no idea where in our messy, unpacked garage they would be.
So project went on hold until I could borrow some from my sister-n-law.

One of the reasons I decided to take on this project was because I thought the only supplies I would need was a can of spray paint.

I only found one scrap of pink fabric that was the right dimensions to work, and it was my least favorite... but I wasn't going to spend extra $ on this, so I went with it. I did have enough padding, but the clear vinyl? Even though I had lots of it, the pieces were all 1 inch short of being wide enough (AARGH!) So, $1.50 and a quick trip to Walmart got me enough, but in the meantime, the project went on hold.

Then, I decided that since I was going to use all the same screws again, I'd better put them in a plastic Ziploc baggie to keep them all safe. I was literally putting them in when one of the screws that holds the back on, fell from my hands (gravity is so cruel to us pregnant woman), hit the kitchen floor, and before I could bend over to pick it up, it rolled under the oven.

I thought about asking my husband to retrieve it. But he is much more practical than me and would know that it was not worth it. In fact, when he saw the chair taken apart, he asked why I didn't just throw it in the garbage. (So I knew there was no sense asking for his help on this project) Luckily, I had the other screw, so I could find one to match- right?
So that also put the project on hold until I could get to Lowe's

Now, a word about Lowe's: I think they are awesome. We didn't have one where I used to live, and it almost makes it worth the move. So, one day I packed me and the 3 year old up and we went there with my one screw. (I can't believe I am confessing this where my husband can read it) Oh, I forgot to mention that the screw was sawed off to about 1/4 inch long so that it didn't poke all the way through and hurt a little kids back while they were sitting on the chair.
The helpful man found me the right size screw, but then, I explained how I needed it sawed off, and gave him my pathetic helpless pregnant woman eyes while my curly-haired 3 year old smiled at him. I've had wood cut at lumber stores, so I assumed you could get metal things cut too. He thought for a minute, then walked over and opened up a new hack saw, put the screw in some vices that were on display, and cut me three screws at the proper length. I thought they had a shop where they would cut it.
Talk about service.

Then it was time to assemble it. I was so proud that I had managed to find my staple gun in a box I had unpacked, and I went to work. I was about half way through re-upholstering the seat when it ran out of staples... so it went on hold again until I could make it back to Lowe's to find some staples for the gun.

To be honest, it could have used another coat of spray paint (next time I'll use primer first) but the can was empty, and after all this effort (even though by this point my husbands idea of throwing it away looked really tempting) I was determined that it was just going to get done!

So it did! The vinyl was pretty stiff, so hard to put on the chair back because it curved, but my daughter was thrilled with it, and now we have 3 little pink chairs to go around the princess table! We really needed it, because when my daughter has her 2 cousins over, they can all eat and play there!

Monday, November 29, 2010

Quick Little Project (#10)


A few weeks ago I decided that I needed to do a quick little project. I really needed that feeling of getting something DONE! So, I had seen these all over blog land, and after we had unpacked a little (and I found my E-6000 glue) I realized that I had somehow accumulated a whole bunch of vases. Now, I know I will never need so many. Trust me, I am not given armloads of flowers by my many admirers, so I decided to turn them into a decoration.

I had a pair of candlesticks that I had picked up a few years ago for a few bucks. I rarely used them, because have you ever noticed how hard it can be to get two taper candles to stand straight up? You need melted wax to get them to stay, or putty, or something. So, they weren't getting much use...
A little E-6000 glue...
Hey, wait, I have 2 candlesticks.... so I found another vase, a different shape and height, but I think it works better that way.

I didn't have enough acorns to fill them to the top, so I added these little mini pumpkins.
Since I never really found my box with most of my fall/ Thanksgiving decorations in time, these really helped the house look festive.
Yesterday I packed up the Thanksgiving decorations, and decided that these would look great filled with some ornaments, or pinecones, or something else for Christmas.

Tuesday, November 9, 2010

This counts for a lot of projects


So, I've obviously not posted any projects for months and months. I thought this was entirely due to being pregnant and moving. But, I've realized that there is something else that really gets in the way of getting any projects done.
It's called Motherhood.
My mom told me that it doesn't matter how many kids you have- 1 or a dozen, they will take up ALL your time. She is (as usual) completely right. So, I've decided to stop trying to figure out if I'm crazy for having my 4th kid, and just embrace the fact that I may never get another project of my own done for the next 20 years.
And, I've decided that it's O.K. to count projects that I do with my kids.
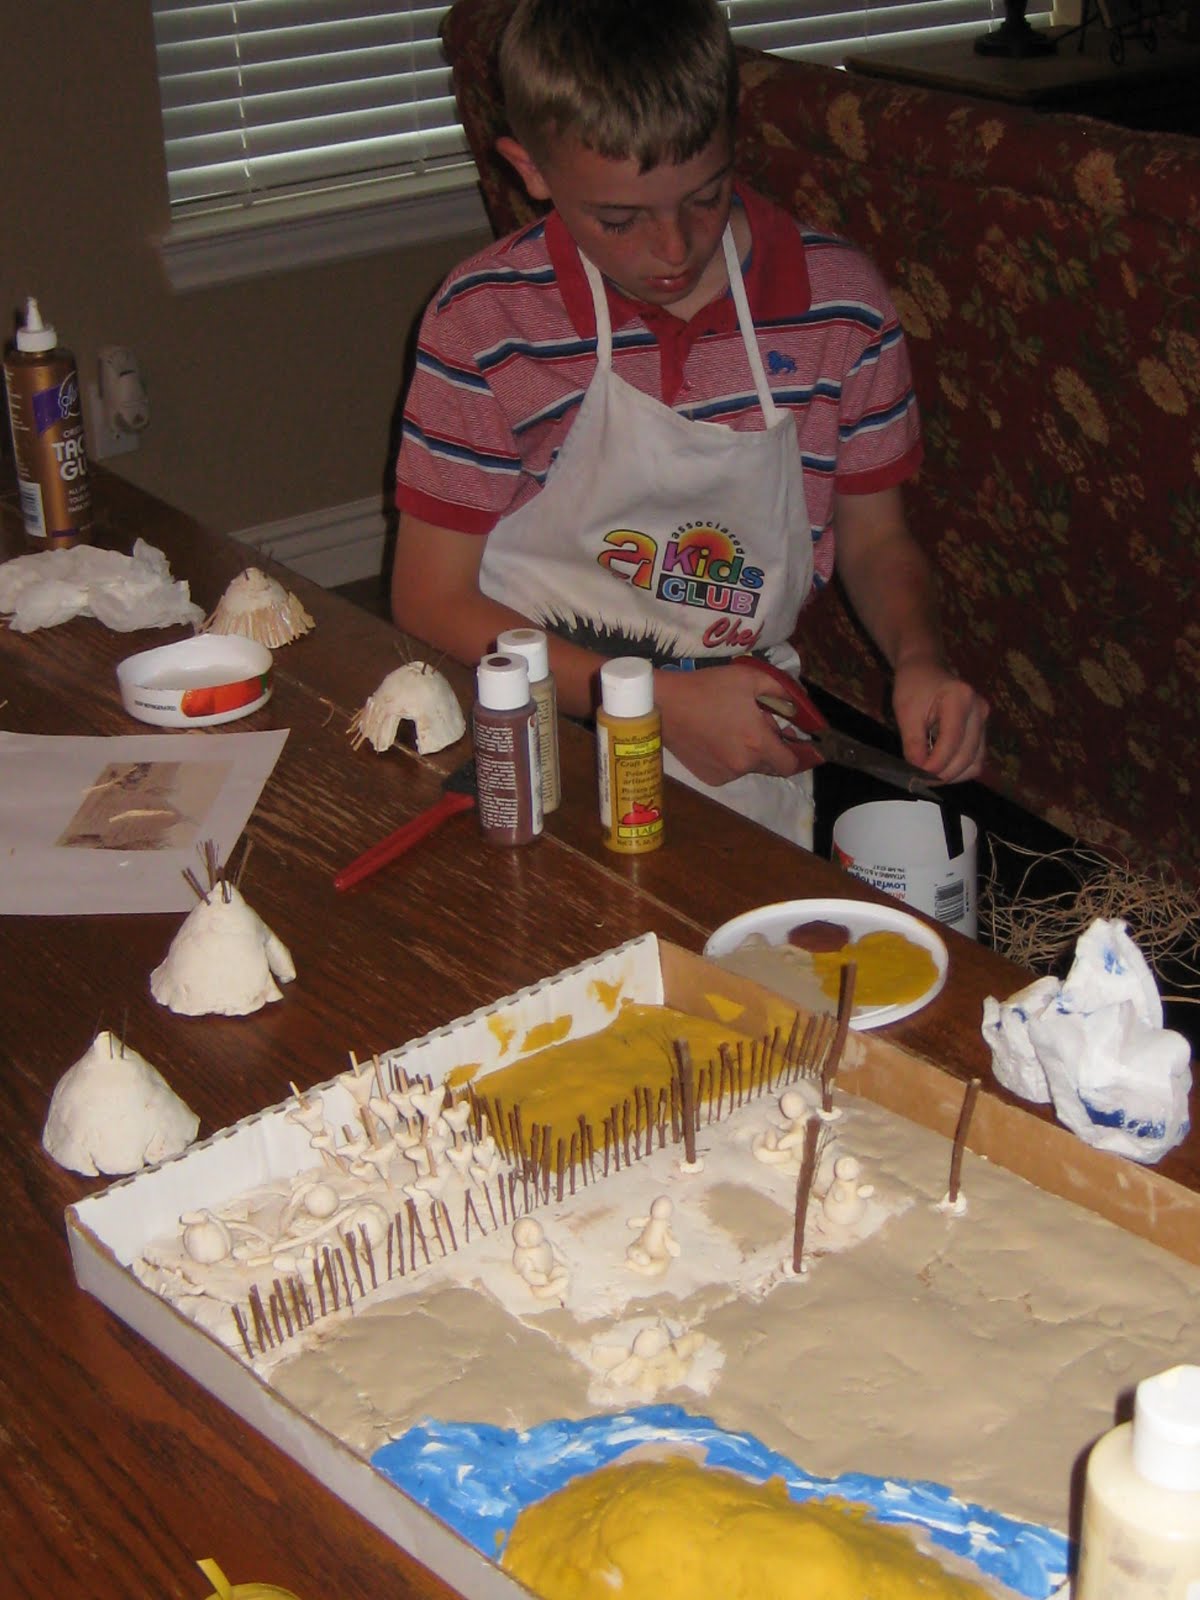
My 4th grader was assigned to make an Indian Village diorama. He could choose any Indian tribe of Texas, and went with the Wichita.
I made the baking clay, and we went to work.

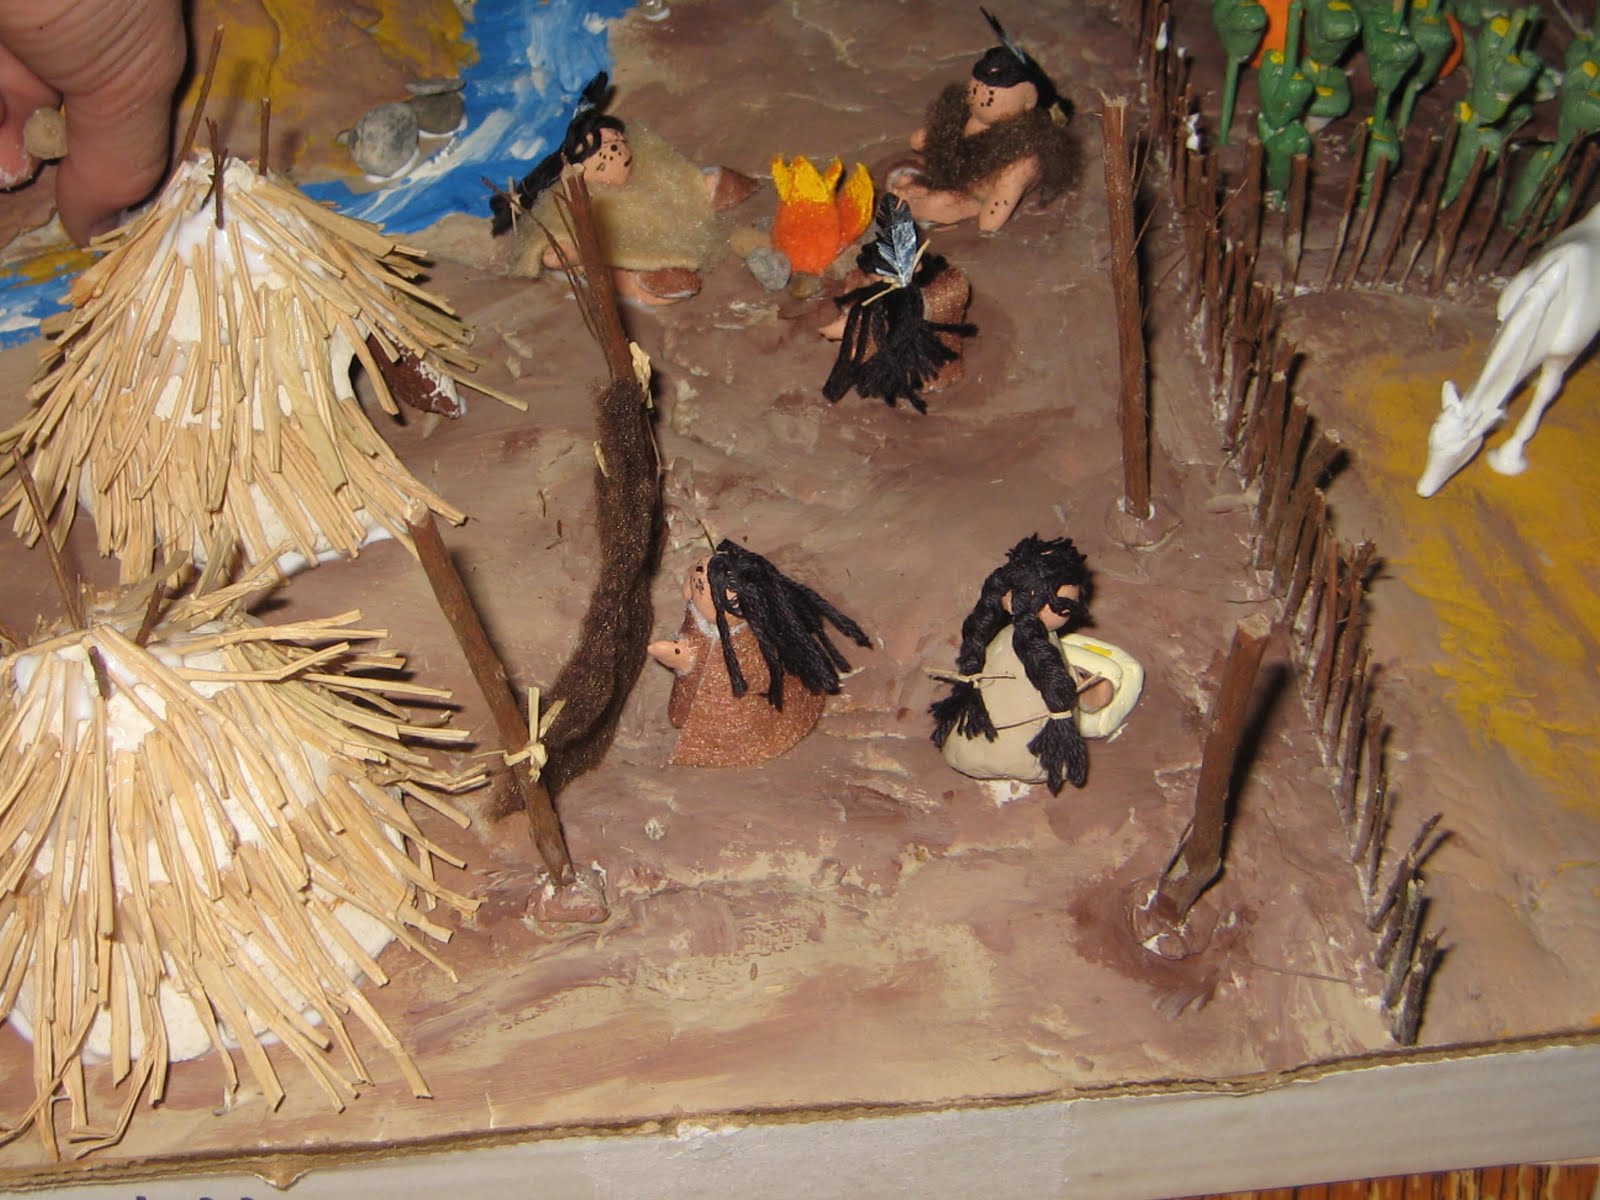
These are not actually teepee's. They were permanent structures made from mud, minimal wood, and straw/grass.
Making those little Indian people was the hardest part. The next day the teacher sent home some plastic Indians that the kids could use. A day too late, and since we'd already put the work into it, we were keeping our little clay people.
My son painted it...
And put straw on all the houses.

Here's some close-ups of our little people sitting around the fire, tanning a buffalo hide, and grinding corn.
That's my sons hand, gluing rocks on in the upper left hand corner, so you get a sense of how tiny these people were!

Anyway, we are really proud of this project, my son and I work really well together on things like this, so we are hoping he nails the oral report and winds up with a grade worthy of the 20 plus hours we spent on this project!!!

Tuesday, August 3, 2010

Project #8 -Old desk made new


Don't worry, it's the before picture. I picked up this baby for $45. The catch was it was in an upstairs loft office of a big warehouse, and my husband and his friend had to figure out how to get it down. I think it involved a makeshift ramp and lots of rope. Yes, he really loves me.
And that thing is HEAVY!
But, it was big (check), had lots of drawers (check) and fabulous lines from the molding to really give it some pretty character (check)

Here it is before I finished the drawers:

Here is the front: I love that it's not all flat.
And here you can see it with the new hardware (I need to find a new lock to go in the middle drawer)
So, tell me what you think. Unless you don't like it, then you can just tell me you are proud of me for getting it finished!