Thursday, April 29, 2010

How To Make A Bridal Cake

Remember this Bridal cake?

Well, like I said, I'm not much good at tutorials, but I will tell you how I made it, and pass along any tips I've learned along the way.

This is the first doll cake I ever made:
It was for my daughter's birthday a few years ago. Before I ever took any classes, or started dabbling in fondant.
I asked a friend who had just made one for her daughters birthday if she would help me out. She introduced me to using rice crispy treats in cakes (one of the best kept secrets out there!) Yep, this cake was made out of Rice Crispy treats!
I made cupcakes to go with it, (that she got to decorate) so there was some cake involved:
[Tips: I don't have the doll cake pan: I used my Pampered Chef batter bowl. Works perfect, but you need to add something at the top, or it doesn't quite go up to her waist. (Try rice crispy treats, fondant, frosting, whatever works)]

I was feeling more confident this time, and baked an actual cake.
[Tip: to make sure it cooked evenly, I put a metal skewer in the middle of it. Don't know why this works, but is supposed to be helpful on large or deep cakes to ensure more even baking.]

However, as I was trying to level it, I ended up cutting off way too much!
So, out came the butter, marshmallows, and Rice Crispies!
You can see where I added it at the top and bottom to give the doll more height. (Chocolate cake in the middle)
Then I covered it with a crumb coat of frosting (with help from my 2-year old) and refrigerated it for a few hours.
Then I made my fondant, and put Barbie in. For my first doll cake, I just used a knock-off Barbie that I got at the Dollar Store. This time I splurged- spent the other $2.50 for the cake pick.
[Tip: Splurge! I had heard horror stories of people going to put the Barbie in and having the whole cake fall apart.]
I had made a veil out of tule and some lace that I attached
[Tip: put this on last! I don't know what I was thinking?!? I had to have my daughter hold the veil out of the way while I put the fondant on- of course, she would have had to hold her hair out of the way anyway- but I wouldn't have had to worry about messing up the veil!]

My fondant ended up being very sticky!
[Tip: roll out small pieces to test if it is too sticky- nothing more frustrating than rolling out enough to cover the whole skirt part, just to find out it is stuck to the counter still! Oh, and be sure to take Barbie out while you put the skirt fondant on!]
It took me a few tries, but I eventually wrapped some fondant around her bodice. I overlapped it in the back, and wet it to get it to stay. My first few attempts didn't work, and she almost ended up with a butter cream frosting bodice instead! Then I added the sleeves...
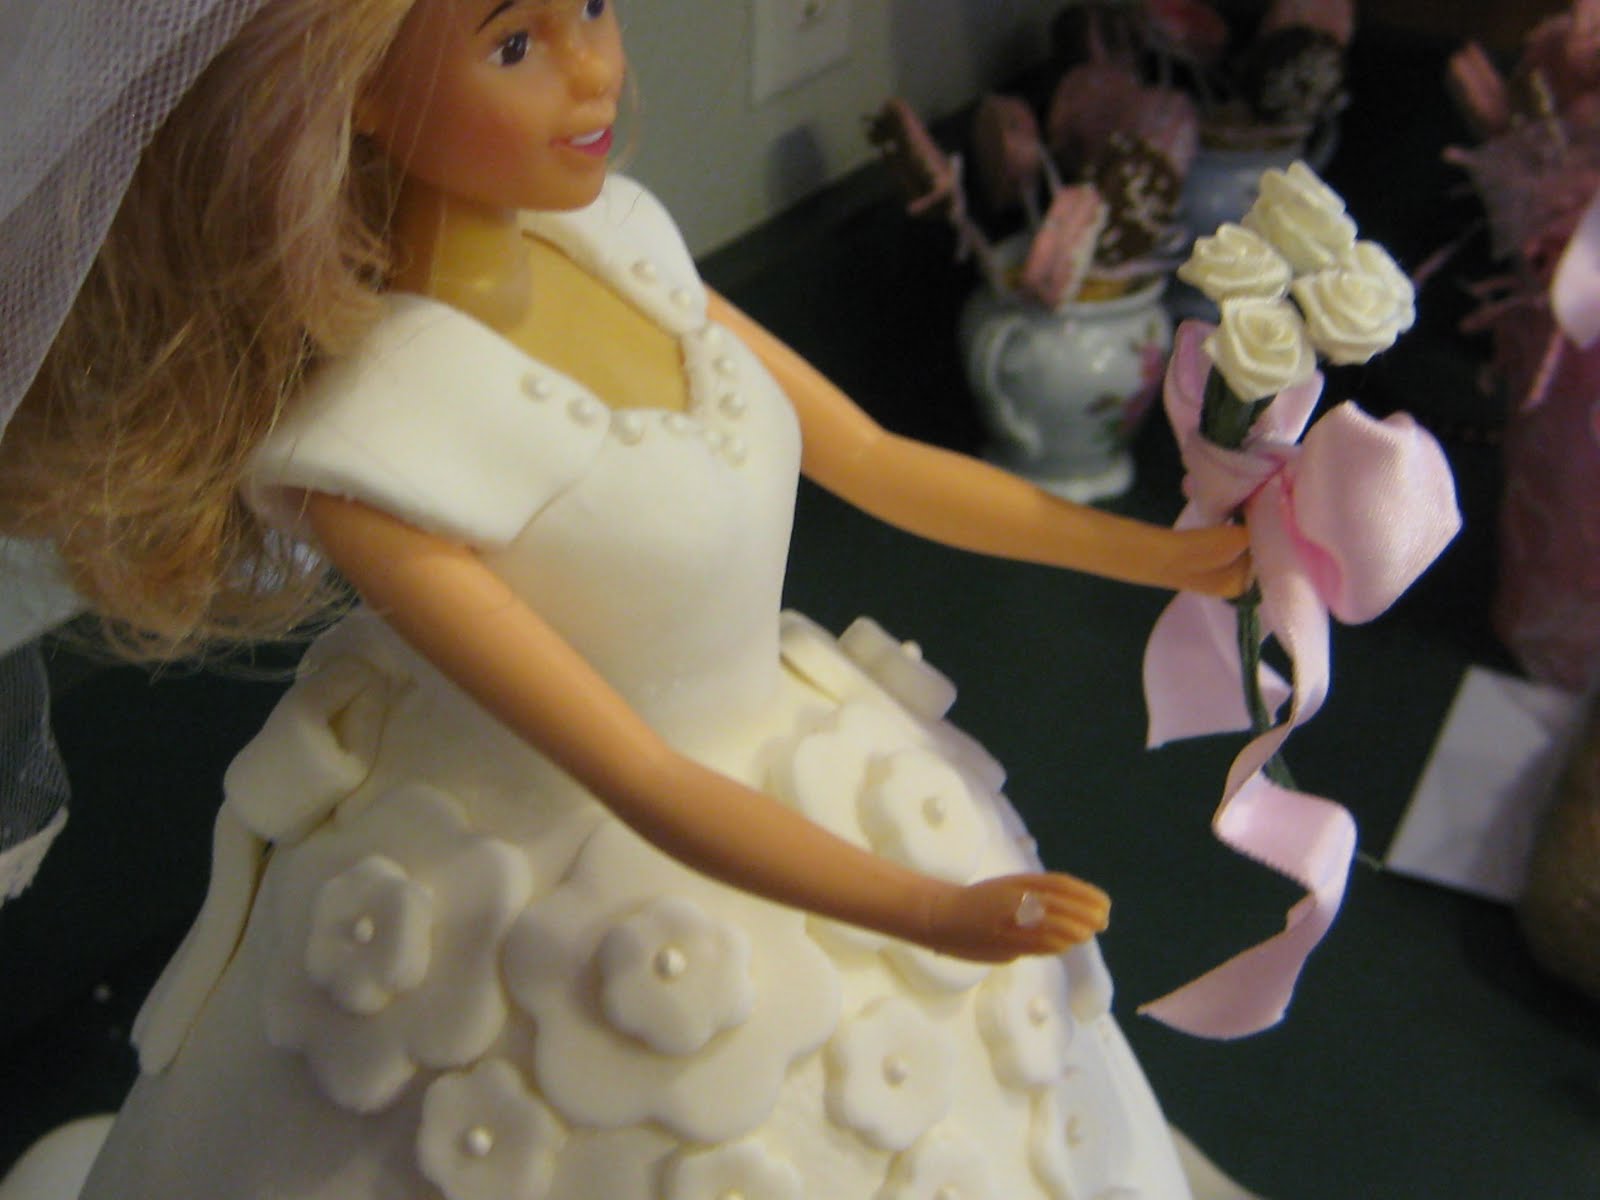
I decided to make a bow to put on the back to cover where the fondant overlapped. I thought it turned out nice.

Then I wasn't sure what I was going to do... My original plan was to put butter cream frosting flowers on it. But, then I remembered that I had bought these flower fondant cutters, and thought I would try them out.
I put some along the bottom, and then decided to try it at the waist. I probably should have just put the smaller size flowers at the waist, but I thought it was O.K. I added some cake gems to the middle of the flowers, and also along her neck line.
If you scroll back up, you can see a close up of the sugar crystal I put on her ring finger (please try not to point out that it's on the wrong hand! Didn't realize until too late!)
We also gave her a bouquet of flowers tied with pink ribbon and added some more lace to where her veil attached to her hair.


I thought she turned out lovely and really made the table spread look pretty.

So there she is, my 2nd doll cake, and my first Bride!
(Please feel free to ask any questions in the comment field, and I will try to answer them!)

Monday, April 26, 2010

Bridal Shower and Brides Cake

This past Saturday, I threw a Bridal shower for a girl from my church, and I thought it would be fun to show you the food buffet and and the cake I made.
These pops are just Oreos with a stick in them, then dipped in Chocolate and then we added some sprinkles and chocolate drizzles.

They were so easy, my 8 year old daughter helped me make them.
I am always looking for an excuse to use my rose dishes that my mother-n-law gave me. This was a perfect opportunity.


The silverware was our one and only splurge when we got married. We used all our gift cards for very practical things. Needs only. But these were on a super good sale, and so pretty, and we had the gift cards... my husband relented on the condition that I used them. So, I try to every chance I can. They cannot be put in the dish washer, and occasionally require some silver polish, but I have no regrets about getting them!!! Putting them in the jars with bows was a last minute thought that I really ended up liking.
Our color scheme was obviously pink. (To go with my rose dishes)
A friend who helped me, gathered up pink colored candies and cookies.
I made the cake. I was so happy with how it turned out. I have done one other doll cake, for my daughter's birthday, but never thought of doing it as a bride. Then I googled bridal shower cakes and saw one, and thought it would be really cute and fun.

I've been doing so much butter cream, after taking the Wilton Cake classes, that I haven't done fondant in a long time... I thought I would do this one in fondant. I am self taught, so it is far from professional, bit I still loved how it turned out. It really became the focal point of the food and the decor.
Here is the bride-to-be with the cake. Later in the week I will try to do a tutorial on the cake. I'm not good at tutorials, but I'll try to give some hints and tell you how I put it together.

Saturday, April 24, 2010

Project #6- and a Happy 30th birthday to my little sis!

So I thought that I was really on the ball, getting this finished a few months ago. Well, I was 90% finished until I noticed on my calendar that her (our) birthday was quickly approaching (our birthdays are a day apart, which has been a lot of fun- we usually shared a birthday cake growing up, and you always know someone is going to remember your birthday! The downside: once my dad brought her a gift on my birthday, and not me, because he had gotten our days mixed up. But I've forgiven him!)
It made me think that I often do that. I get a project almost all the way done, and then I am distracted, put it aside, thinking that I'll get to it soon, and it just sits there...

...and sits there...

...and adds to my pile of unfinished projects.

Does that ever happen to you?

Tell me what helps you to actually finish those projects (without an impending birthday or other deadline!)
As for me? Well, I've decided that it's time to be a 100%-er!

And Happy Birthday Sis. Hope you enjoy your little tote bag! (It's in the mail, if you haven't gotten it yet!)
don't worry, the 30's aren't so bad!

Thursday, April 22, 2010

Find Your Sock Yarn- How to Tackle a Project

Today I was the guest writer over at Find Your Sock Yarn. Be sure to go over and check out my article about how I came to start this blog and take-on my unfinished project list! Then come back and leave me a comment about how you tackle your projects and to-do lists!

Sunday, April 18, 2010

Finished Project #5- Quilt Block for Graduation Gift

Sometimes one of the deterents to getting things on our "to-do list" done, is when new projects come along that have to take priority.
I've decided to just count those ones along with the ones originally on my list!
Obviously this happened to me when I was asked to make a quilt block for a graduating senior from my church (I was actually just relieved that I wasn't asked to make the whole quilt!) Scorching the fabric that they gave me, finding the right fabric, and getting sick- not to mention that I had other projects going on, too- really slowed me down on something that should have been simple and quick!
But, here is it, and I am happy to be done!

Friday, April 16, 2010

Strawberry Jam and a big 'Ole Thank you!

Today I made 17 pints of Strawberry Jam! (Whew!) I haven't done Strawberry Jam for years! But, I had determined not to let another Strawberry season (and strawberries on sale) pass me by without making some!
No recipe here, I just follow the one on the inside of the pectin box! Although it took 4 batches (12 pounds of strawberries) to make it all. The recipe says that each batch should give me 8 pints. I never got that many out of a batch. Anyone else have this problem?
I also tried one batch with the no-sugar pectin and used Splenda. Haven't tried it yet- will have to let you know how it is!
And, after making something so yummy and wonderful, I wanted to share it with someone.
Well, luck would have it that I owe a big thank you to my neighbors.
I have the best neighbors. Everyone needs some neighbors like them. I cannot tell you how many times I have had to rely on them in a crisis!
Most recently- the day after getting home from Spring Break, I locked my only set of keys in the car.
Along with my cell phone.
And my daughter.
What to do?
I ran to the Deckers. After explaining the situation, Billie handed me her car keys so I could take her car to go pick up the kids who were waiting for me at school. She went over to stand next to the car so the baby wouldn't get scared or be alone, and Don called the Sheriff's office who put out an emergency call to a locksmith (who unlocked it for free since there was a child inside!)
So, I decided to take some Jam over to them.
I had made bread the day before, so I had a loaf to go with it, and found a basket to put it in. It still needed something, so I pulled out a new kitchen towel that I had on hand, and embroidered their names on it:
Well, it doesn't do justice to how grateful I am to them, but I thought it turned out nice.

Wednesday, April 14, 2010

Project #4- Kid's Super capes (oh, and Princess, too!)


Last weekend my kids were invited to a birthday party for 2 sisters- our neighbors granddaughters, turning 2 and 5.

Birthday gifts for kids parties can be a little perplexing. I have no idea what toys these kids already have, or what they even like. But, I have one little gift up my sleeve that is always a winner with little kids. (Older kids, now? That is so hard, that lately we've resorted to just giving them money)
I started making these super capes when my older kids were little, using one my mother-n-law had bought as a pattern. For the boys I made them in blue, red, and black. They are reversible with a batman logo on one side, and Superman on the other. (In fact, my son would wear his everywhere we went, and people started asking about it; I started making them for people for $15 each*)
For the girls, I still make one side with the Super logo:

And the other side, I embroider with Princess and their name, and a felt crown. These are also reversible, and made in more girly colors.

Now, I am still counting this as something from my Project list, because I had never gotten around to making one for my youngest. So, while I was at it, I made one for her, too.
Look how excited she is!
*And I'll let you in on a little secret here. These are super cheap to make! 1 yard of fabric, a little velcro, and some felt squares. I think I estimated these to cost about $3.00 to make.
That worked out great too, because my budget is really tight this month after our Spring Break trip!

Saturday, April 10, 2010

I Have a Button! Grab My Button!

It's over there on the sidebar.

Project #3

First of all, I have to say a huge THANK-YOU to my fabulous sister-n-law, Heather for making my new heading!!! Isn't she awesome? Now that I have such a great looking blog, I'm even more motivated to finish projects so I can post them here!
Yesterday was a sick day. Not that we actually get those as moms, but I tried to stay home (other than driving the kids to/from school, dance, and baseball practice), I put on movies for the toddler, and pretty much rested. In between embroidering these towels:

Remember, I said even the small projects count! I bought all these towels, hmmm..... 2 years ago? When I painted the kids bathroom. I decided to put their names on their own towels so that they would be responsible for HANGING THEM UP! (That seems to be an issue around here... and whenever I ask whose towel is on the floor and not hung up, fingers start pointing, and I usually end up hanging it up!) I finished putting the names on my oldest two kids towels, and then, when it came to the youngest... well, who knows what happened. Something sidetracked me, and the towels ended up under my cutting table waiting for me to get to them. The pile of towels bothered me enough that "finish embroidering kids name on towels" made it to my project list.
It wasn't very hard, but hooping, setting up the machine, etc. for each towel did take a while. But, I rested in between, and it feels nice to get something accomplished (and checked off my list) even on a sick day.

Friday, April 9, 2010

Easter Cake

I'm really lucky when it comes to holiday baking. My husbands co-worker (who also loves to cook) invites us over every holiday. It really gets me off the hook for cooking, especially during holiday busy time.
I did, however, want to practice my newly learned cake decorating skills. I wanted to practice the basket weave again. This time I did it in chocolate. It turned out great, and went even faster this time. I thought that the frosting was good, but next time I will probably try using melted chocolate instead of the cocoa powder.
As we were heading out the door, I wanted to take a picture of it. But then I noticed my husbands shoes were in the picture.
So I took another one:
This time I caught my daughter's shoe in it.
I guess with so many feet running through this house, it's bound to happen.
Here's a picture of that cute little 2 year old with her Easter Dress on (the sun hat was her own idea. Little girls are so fun!)

Thursday, April 8, 2010

Every Little Project Counts! Here's Project Completed #2

Some projects aren't very big, or very hard, but it's still great to cross them off your list!
This is a Zentangle patch. It is for a group project that my quilters guild is doing for our quilt show this coming fall.

Liz, a member of my guild, got into this Zentangle drawing thing. She asked if I would work on the group project. I got started with some small drawings that I did with pen and ink. I really enjoyed it. I started drawing on some ceramic eggs, too.

For the group project, we applied the same ideas to fabric. I thought this would be easy since the fabric is already patterned, but I learned that I actually prefer drawing it- it gives me more artistic control I guess. I get to manipulate the pattern when I am drawing it myself.
Anyway, It's done! Yippeee!

Sunday, April 4, 2010

Quick and Easy Chili With Beans

The other day I pulled some hamburger out of the freezer. My plan was to grill hamburgers for dinner (this is my middle child's favorite meal). Then one of our awful New Mexico Spring winds hit. Let me give you an idea of how bad our spring winds can be. This is the damage done to our fence the week before:

I was still on Spring Break with my kids. I didn't believe that it could knock over our brick fence posts. (They are half filled with cement) I had to see it for myself when I got home. What a mess!
Anyway, I did not want to be outside grilling in a sand storm.
So, I quickly opened up the New Mexico Cooking Book to see if there was a quick and easy chili recipe.
Hey, whatayaknow?

Quick & Easy Chili with Beans

1/4 cup vegetable oil
3 lbs. lean, coarsely ground beef
2 small green peppers, chopped
2 medium onions, thinly sliced
2 garlic cloves, crushed
3 (16 oz.) cans whole tomatoes (I was using up some canned ones from my garden from last summer, and they were more like crushed tomatoes than whole. Still fabulous!)
3 Tablespoons chili powder
2 teaspoons crushed cumin seeds
1/4 teaspoon Tabasco sauce
1 cup water
3 (15-oz.) cans pinto or kidney beans

1. Heat oil in a large Dutch oven or heavy pot. Cook beef, green peppers, onions, and garlic in oil until beef is lightly browned.

2. Add all remaining ingredients, except beans. Cover and simmer 45 minutes.

3. Stir in the undrained beans. Cover and Simmer 25 minutes.


I thought these were fabulous. The kids loved them too. My husband prefers them a lot more spicey. (Don't worry, there are plenty more chili recipes in this book that fit that bill!) It made a lot, so I had leftovers the next day, and thought it tasted really good then, too, the flavors having more time to steep together. I have to confess that instead of making one of Clyde's cornbread recipes, I made my stand-by (you know- the one on the cornmeal box...) You see, I couldn't eat starches or sugar until after Easter, and I knew I would want to taste the ones from the book. So, next batch of chili will be accompanied by some new cornbread recipes!